Previously, we explored how to install and load an R package to generate correlograms by executing R code within SPSS syntax. In this post, we’re going to look at how we can build a custom dialog in SPSS Statistics that encapsulates much of our previously created code and allows us to share the procedure with other users. Custom dialogs allow us to create a sharable user interface that execute and generate SPSS command syntax including syntax that contains R or Python code. To create a new custom dialog, from the main menu, click:
Extensions > Custom Dialog Builder for Extensions
This will launch the Custom Dialog Builder, which is an interactive window that allows you to design and preview a custom dialog. Before the Custom Dialog Builder interface itself is generated, users are presented with an option to create custom dialogs that are compatible with versions of SPSS Statistics that are older than release 24.
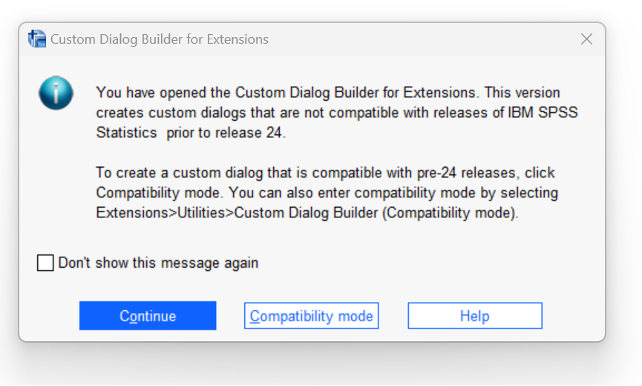
In this example, we don’t need to create a dialog that is compatible with versions of SPSS Statistics prior to release 24 so will simply click:
Continue
The Custom Dialog Builder is now generated and displays a number of features such as variable lists, radio buttons, check boxes and other interface controls that users can drag and drop onto a blank dialog design canvas. These interface controls can then be mapped as choice parameters within the procedure’s associated syntax in the adjacent syntax template editor.
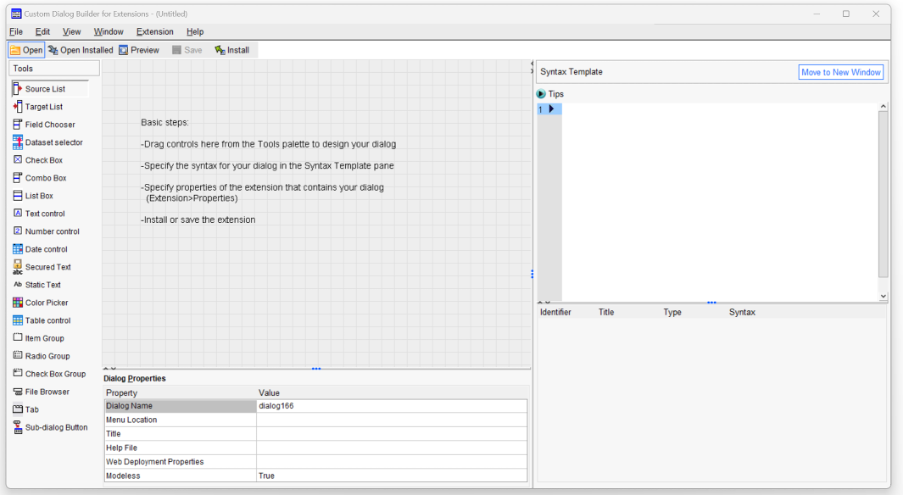
In this example, the blank custom dialog is given a default name of dialog168. Before we get started with building the actual dialog interface, we might want to assign a new name and tell SPSS where we want the dialog to be stored in the SPSS menus. We can do this by editing the dialog properties on the bottom left side of the builder.
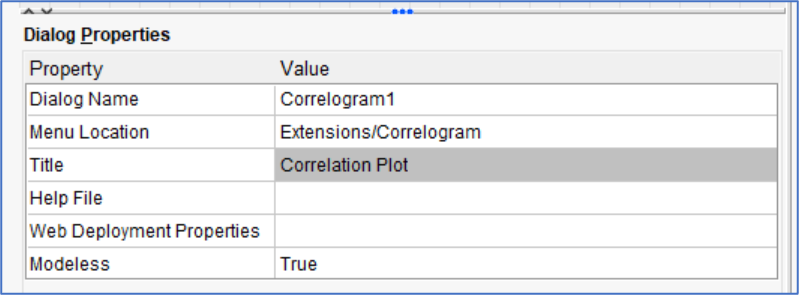
To begin with, we can edit the dialog name in its associated value cell to Correlogram1.
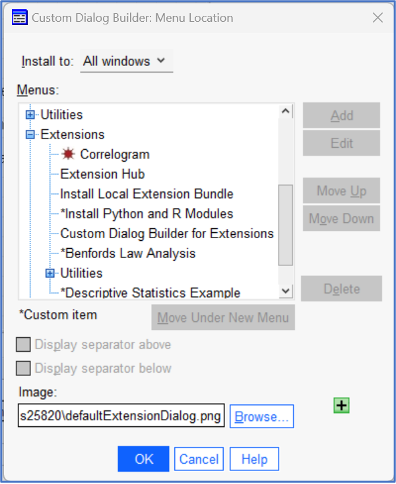
Secondly, we can select the location where dialog should be stored by clicking the ellipsis in adjacent cell to the Menu Location property. In this example, as the following image shows, the dialog will be stored in the Extensions menu.
Lastly, we can provide a title for the procedure in the adjacent cell to the Title property. Edit the value to:
Correlation plot
The completed Dialog Properties section is shown in the following screen shot.
It now makes sense to add variable list controls so that we can choose which variables can be added to the procedure. From the left side of the dialog builder:
Click and drag a Source List control to the builder canvas.
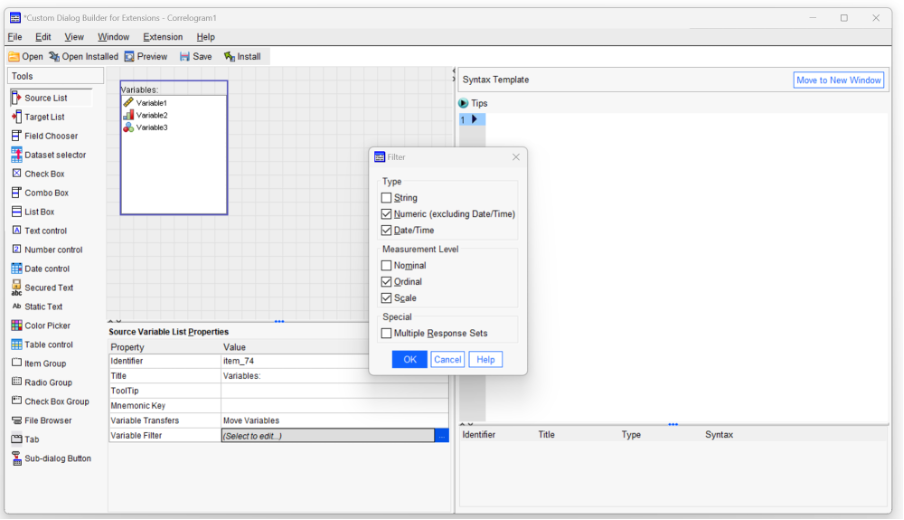
Once this is done, click on the Source List element within the canvas and notice that it too has its own set of properties that can be edited. For example, the Variable Filter control in the last row of the associated properties menu allows us to restrict the variable types are available to the procedure. To edit this:
Click the ellipsis in the cell adjacent to the Variable Filter property.
We can take the opportunity to edit this property to ensure that the source variable list does not display string or nominal variables which are inappropriate for the correlation procedure. From the Filter sub-dialog:
Deselect the variable type:
String
And also the measurement level:
Nominal
We can see the dialog builder at this stage in the following image.
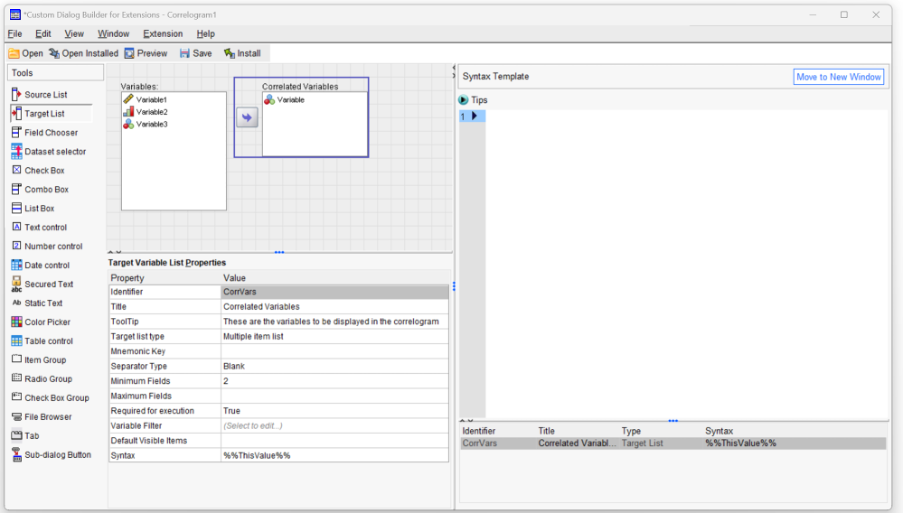
Clicking the OK button returns us to the main dialog builder interface. Now we need to create an area to add any selected variables to the correlation procedure. From the left side of the dialog builder:
Click and drag a Target List control to the builder canvas.
The Target List box should now be displayed on the right side of the Source List. Again, there are a number of properties that we should take a moment to edit before proceeding. The first thing that we can do is to assign a new Identifier to the Target List element. In our example it has been given the default value item_75 (the name is effectively arbitrary).To make things clearer as to what this element actually refers to:
Edit the identifier name so that it is called CorrVars
In a similar fashion, edit the Title property so that is called:
Correlated Variables
In the ToolTip property, add the following explanatory text:
These are the variables to be displayed in the correlogram
In the Minimum Fields property add the value:
2
The following image shows the dialog builder at this stage. You can see the changes we just made displayed in the Target Variable List Properties section.
We’ve now reached the critical part of the process where we need to map the Target List element to the syntax we created in our previous blog post. To do begin the process:
Copy and paste our previously created syntax into the Syntax Template area of the dialog builder
We can see this in the following image:
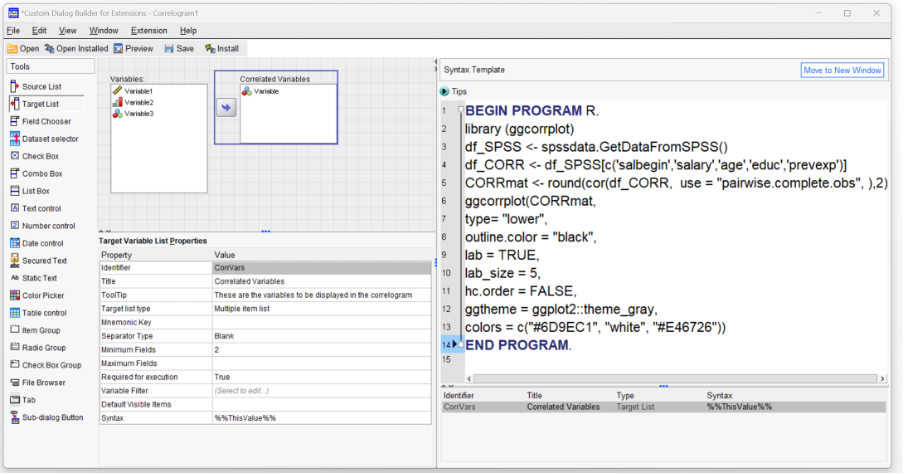
You will notice that the syntax still contains the names of the variables that we used to develop the code from our earlier sample dataset. They are shown in the following R statement that defines the data frame df_CORR.
df_CORR <-
df_SPSS[c('salbegin','salary','age','educ','prevexp')]
Of course, in order to create our custom dialog, we need to make sure that this list is populated with any variables the user sends to the Target List box irrespective of what they are called. To do this, we need to replace the list of variables in the code with a parameter value that refers to the contents of the target variable list. You will recall we explicitly named this identified this item as CorrVars. In the Custom Dialog Builder’s syntax template, to reference an item as a parameter, we encapsulate the item identifier in double percentage marks, so the contents of the target variable list are now referred to as %%CorrVars%%.
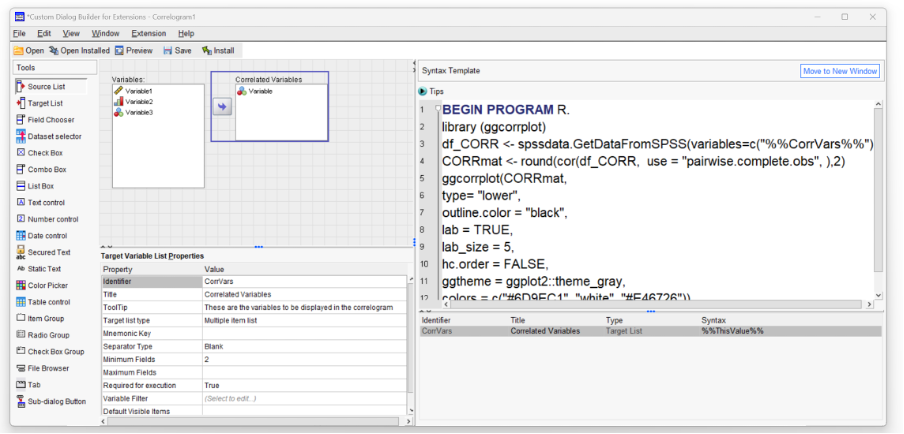
Before we do so, we no longer need the data frame df_SPSS (technically we didn’t need it earlier, but it helped to explain concept of data frames). With that in mind we can just delete the following line:
df_SPSS <- spssdata.GetDataFromSPSS()We can however, still use the spssdata.GetDataFromSPSS()function that we introduced earlier and we will do so by replacing the line:
df_SPSS[c('salbegin','salary','age','educ','prevexp')]with the following line:
df_CORR <-
spssdata.GetDataFromSPSS(variables=c("%%CorrVars%%"))
Note that we’re using the variables = argument, so now any variables in the target list will populate the data frame df_CORR. The full syntax is as follows:
BEGIN PROGRAM R.
library (ggcorrplot)
df_CORR <- spssdata.GetDataFromSPSS(variables=c("%%CorrVars%%"))
CORRmat <- round(cor(df_CORR,  use = "pairwise.complete.obs", ),2)
ggcorrplot(CORRmat,
type= "lower",
outline.color = "black",
lab = TRUE,
lab_size = 5,
hc.order = FALSE,
ggtheme = ggplot2::theme_gray,
colors = c("#6D9EC1", "white", "#E46726"))
END PROGRAM.
This syntax is also shown in the custom dialog syntax template window in the following image.
Before we can continue, we should save the custom dialog. To do so, within the Dialog Builder click:
File > Save
You may notice that a message now appears warning us that the dialog requires us to assign some properties to it before the it can be saved.
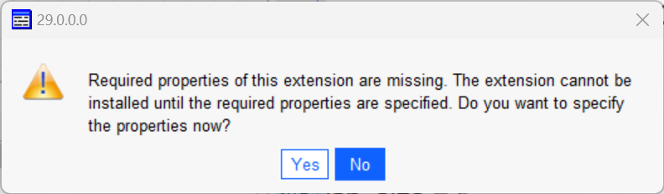
To assign the properties, click:
Yes
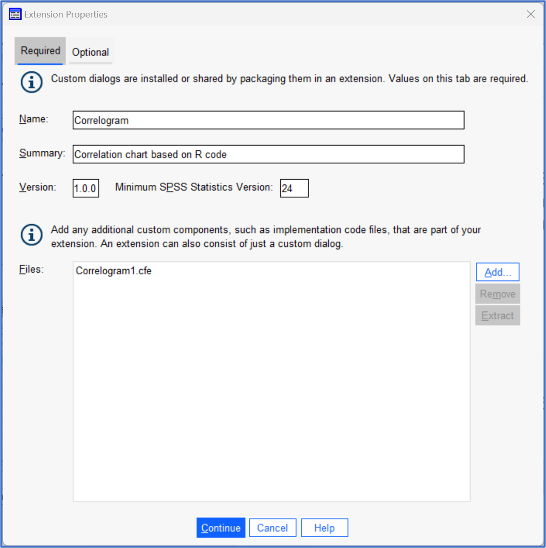
The Extension Properties dialog requires us to provide a name and some text in the summary box before it can be saved. Note that you can add other details such as Author, Date and information about any code dependencies. In our example, we have named the dialog Correlogram and provided some short descriptive summary text.
Once the dialog is saved, we can preview it. On the Custom Dialog Builder toolbar, click the button marked:
Preview
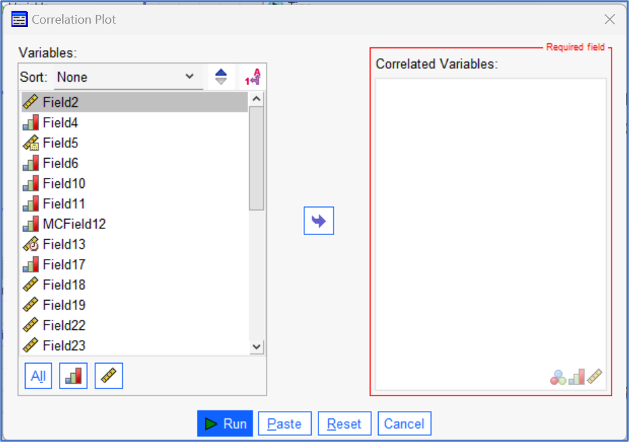
The following image shows a preview of the new custom dialog.
Finally, we can test, this initial custom dialog by installing it. To do so, on the Custom Dialog Builder toolbar, click the button marked:
Install
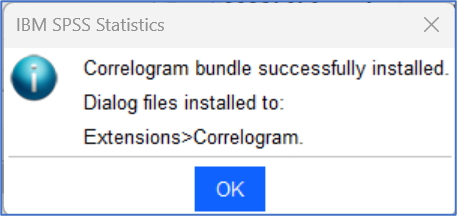
A message appears, telling us the dialog has been successfully installed.
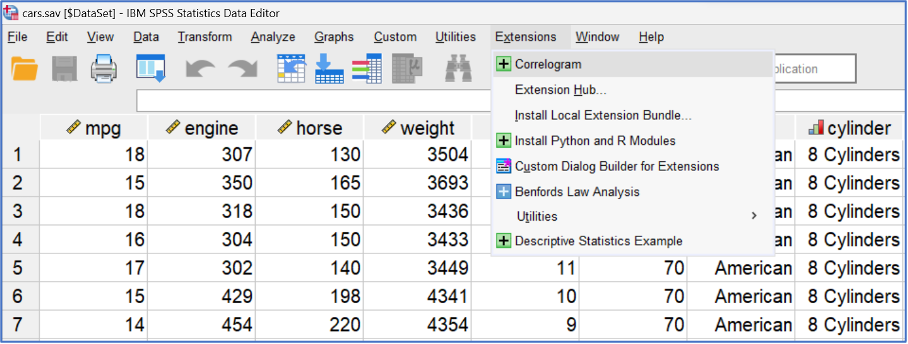
Now to test the dialog out. After closing the Custom Dialog Builder, from the main menu in the SPSS Statistics Data Editor window, click:
Extensions > Correlogram
To test the procedure out we will use a different dataset than before. The next image shows a mix of scale and ordinal variables have been selected from the cars.sav data file.
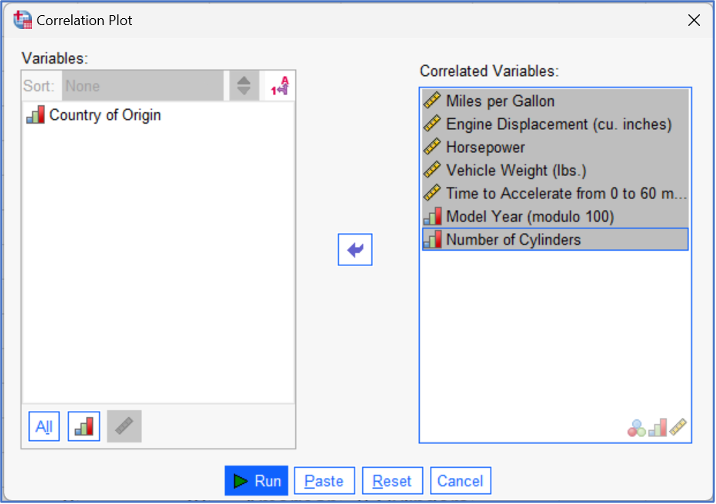
Clicking the Run button in the custom dialog generates the following output.
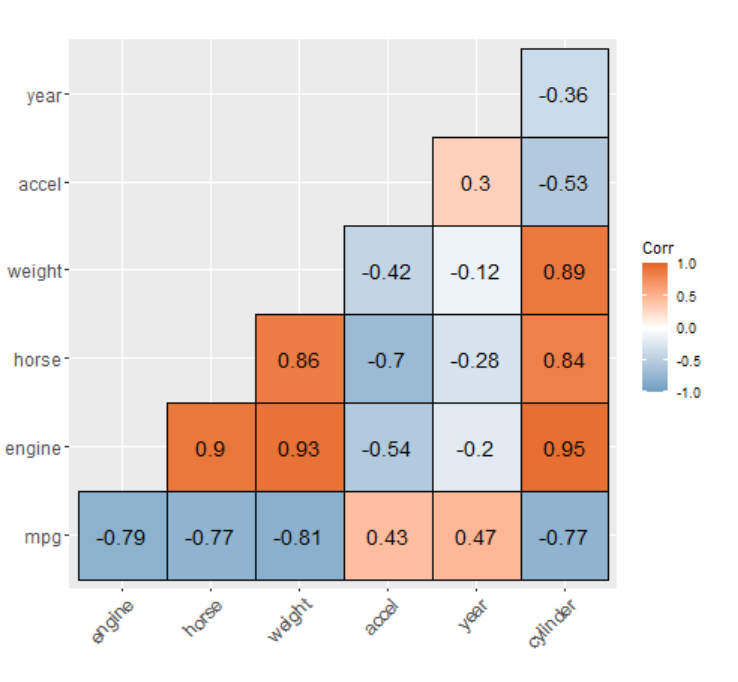
We can also view the syntax that the same procedure generates when we click the custom dialog’s paste button.
BEGIN PROGRAM R.
library (ggcorrplot)
df_CORR <- spssdata.GetDataFromSPSS(variables=c("mpg engine horse weight accel year cylinder"))
CORRmat <- round(cor(df_CORR,  use = "pairwise.complete.obs", ),2)
ggcorrplot(CORRmat,
type= "lower",
outline.color = "black",
lab = TRUE,
lab_size = 5,
hc.order = FALSE,
ggtheme = ggplot2::theme_gray,
colors = c("#6D9EC1", "white", "#E46726"))
END PROGRAM.
In our fourth and final blog post in this series, we will see how to add additional options to our correlogram custom dialog so that we can control things like colour themes, label size and hierarchical clustering to create a fully functioning procedure.