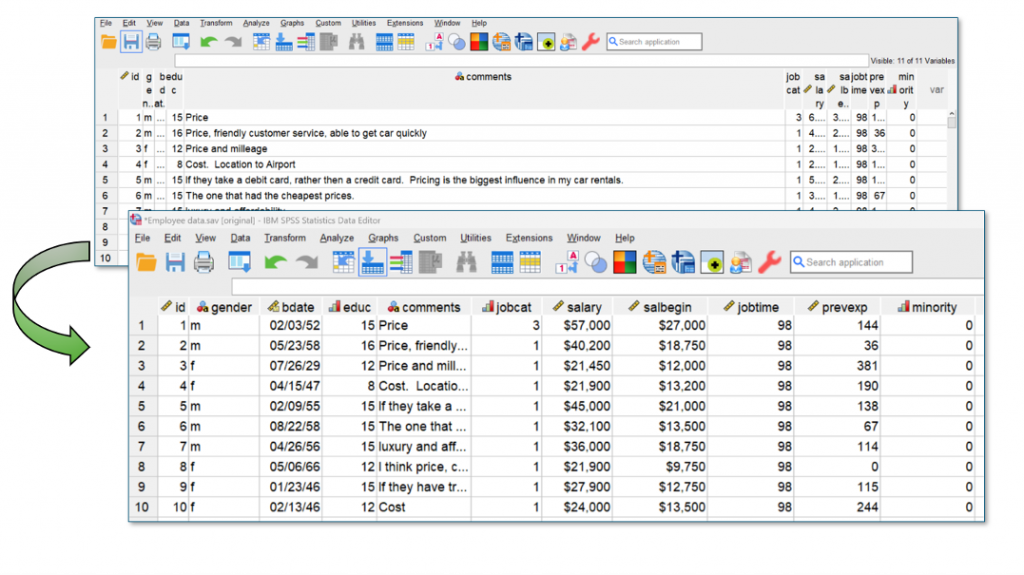
Does the above image annoy you? You read a file into SPSS successfully, but the column headers are either squashed into a display width so small that you can’t read the variable names or they’re unnecessarily so wide that the names appear marooned in a sea of grey. You can either, manually adjust each one with the mouse pointer (a process that becomes increasingly tedious the more variables you have), switch to the Variable View and copy and paste display width values within the Column properties (at best, a haphazard exercise), or write the process out in syntax (only worth doing if you are likely to read an updated version of the data in the future). If you are a regular MS Excel user, either one of these approaches becomes especially vexing when you know that within that particular software, you can automatically change the column display width to fit the field name with a single click. Unfortunately, no such feature exists in IBM SPSS Statistics.
However, that doesn’t mean that you can’t create something to help. Like any SPSS user that works with a wide variety of data sources, Smart Vision’s pre-sales director Jarlath Quinn got fed up with adjusting the column display widths every time he read a new file. He’s well aware that doing so has no bearing on the rest of the work he does with the package, but he just finds it hard to abide the messy appearance of the variables in the Data Editor.
As a result, he wrote a syntax file that you are welcome to download and use if you feel the same way.
To execute the syntax, you just need to be aware of a couple of minor caveats:
- The syntax changes the dataset name (not the file name) of the active file to ‘original’. By default, this is usually labelled $Datset1. You can always edit this name in the syntax or change it back manually if you wish (File > Rename Dataset).
- The syntax assumes you have a folder called “C:\temp”. If not, either create a C:\temp folder, or simply open the syntax file and use the Edit > Replace dialog to change C:\temp to the name of a folder that you would prefer to use.
If you like, you can create a ‘hot button’ to be added to the Data Editor’s toolbar so you can execute the syntax instantly.
To do this, extract the contents of the downloaded zip file to a location of your choosing (e.g. C:\temp).
- Within the Data Editor window, click View > Toolbars > Customize > Edit
- In the Categories menu, scroll to the end and choose User Defined
- Within the same dialog, click New Tool.
- In the Description box type a name for the button (e.g. ‘Autofit Column Display’)
- In the Action area choose Syntax
- Click Browse to locate the extracted syntax file: sps
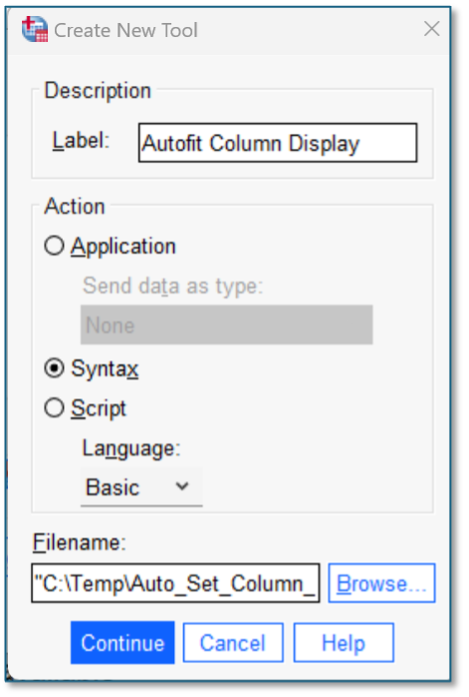
Creating a Toolbar button for the Autofit Column Display procedure
- Click Continue to return to the Edit Toolbar
- You should see the new tool listed in the Tools menu on the right side of the dialog
- Drag the its icon onto the end of the customisable toolbar preview below it
- You can now change the icon’s appearance by choosing a different .bmp file to represent it. To do so, having selected the new tool icon, click Change Image
- Return to the same folder where you extracted the syntax file and choose the file bmp to replace the icon
- Click Continue and OK
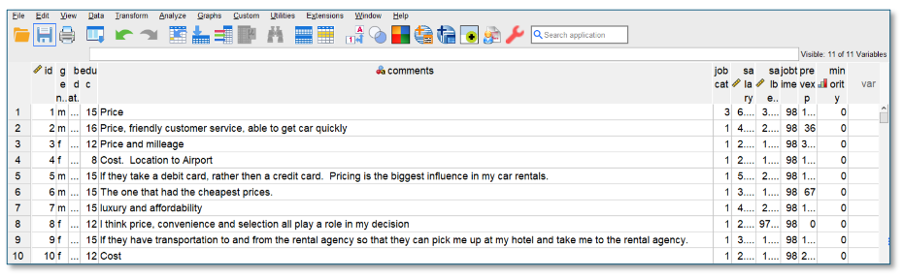
Now test out the Autofit Tool. You should find that it automatically re-sizes the displayed column widths of an active data file as shown below.